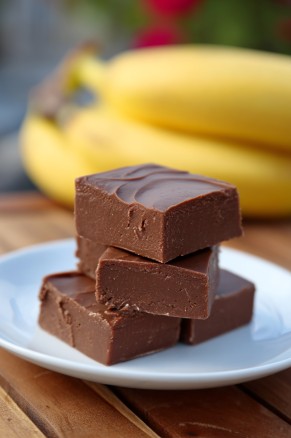
Hey y'all! Looking for a guilt-free sweet treat that's ultra-creamy, naturally sweetened, and takes minutes to whip up? This 3 Ingredient Banana Fudge (NO dairy or sugar!) is the perfect answer for snack cravings, post-workout bites, or healthy dessert tables. No tricky equipment or obscure ingredients—just wholesome, melt-in-your-mouth yumminess! Let's get cooking!
Why You'll Love This
- It’s naturally sweetened with bananas, making it a healthier treat.
- Ready in just 10 minutes of prep, ideal for busy days.
- Packs a rich, creamy, melt-in-your-mouth texture—without any dairy or sugar!
- Totally vegan, gluten-free, and allergy-friendly.
- Perfect for sharing (or keeping all to yourself!).
Ingredients
- 2 large, very ripe bananas
- 1 cup natural peanut butter (or almond butter)
- ¼ cup unsweetened cocoa powder
Directions
Prep Your Pan
- Line a small loaf pan (8x4 inch) or square pan with parchment paper for easy removal.
Blend the Base
- Peel the bananas and mash them well in a mixing bowl, or blend in a food processor until completely smooth.
- Add the peanut butter and unsweetened cocoa powder to the bananas. Stir or blend until fully incorporated and silky.
Pour and Set
- Pour/scrape the mixture evenly into the lined pan, smoothing the top with a spatula.
- Freeze for at least 2-3 hours, or until firm enough to slice.
Slice and Serve
- Remove fudge from the freezer and let it sit at room temperature for 5-10 minutes to soften slightly.
- Lift out of the pan, cut into squares, and enjoy!
Notes
- For easiest slicing, use a hot sharp knife and wipe between cuts.
- If you prefer a softer texture, store in the refrigerator instead of the freezer.
- Overripe bananas add extra sweetness—use the spottiest ones you have!
Variations
- Nut-Free Fudge: Swap peanut butter for sunflower seed butter.
- Chunky Monkey: Stir in chopped walnuts or vegan chocolate chips before freezing.
- Coconut Bliss: Mix in 2 tablespoons shredded coconut for a tropical twist.
Required Equipment
- Loaf or square pan (8x4 inch or similar)
- Parchment paper
- Mixing bowl and spatula (or food processor)
- Measuring cups
Storage Instructions
Store leftover fudge squares in an airtight container in the freezer for up to 2 months. For softer fudge, keep in the fridge for 5-6 days.
Suggested Pairings/Serving Recommendations
- Pair with fresh strawberries or sliced bananas for an extra fruity dessert.
- Serve with a drizzle of more nut butter or dusting of extra cocoa powder.
- Enjoy with hot coffee or a creamy almond milk latte.
Pro Tips
- Use the ripest bananas you can for maximum natural sweetness.
- For ultra-smooth fudge, blend the mixture in a food processor rather than by hand.
- If you want perfect squares, let the fudge partially thaw for just a few minutes before cutting.
FAQ
- Can I use frozen bananas?
Yes, just thaw and drain off any excess liquid before blending them smooth. - Can I use a different nut butter?
Absolutely! Almond butter or sunflower seed butter work great. - It didn’t set—what went wrong?
Be sure to measure your ingredients precisely and freeze long enough; too much banana or using a very shallow pan can affect firmness.
Prep time: 10 minutes
Total time: 2 hours 10 minutes
Servings: 12 squares
Ingredients
- 2 large, very ripe bananas
- 1 cup natural peanut butter (or almond butter)
- ¼ cup unsweetened cocoa powder
Instructions
-
1Line a small loaf pan (8x4 inch) or square pan with parchment paper for easy removal.
-
2Peel the bananas and mash them well in a mixing bowl, or blend in a food processor until completely smooth.
-
3Add the peanut butter and unsweetened cocoa powder to the bananas. Stir or blend until fully incorporated and silky.
-
4Pour/scrape the mixture evenly into the lined pan, smoothing the top with a spatula.
-
5Freeze for at least 2-3 hours, or until firm enough to slice.
-
6Remove fudge from the freezer and let it sit at room temperature for 5-10 minutes to soften slightly.
-
7Lift out of the pan, cut into squares, and enjoy!
Approximate Information for One Serving
Nutrition Disclaimers
Number of total servings shown is approximate. Actual number of servings will depend on your preferred portion sizes.
Nutritional values shown are general guidelines and reflect information for 1 serving using the ingredients listed, not including any optional ingredients. Actual macros may vary slightly depending on specific brands and types of ingredients used.
To determine the weight of one serving, prepare the recipe as instructed. Weigh the finished recipe, then divide the weight of the finished recipe (not including the weight of the container the food is in) by the desired number of servings. Result will be the weight of one serving.
Did you make this recipe?
Please consider Pinning it!
Leave a Reply